If you're quilting, the rotary cutter, cutting mat and ruler combo are a must-have. You can get away without rulers if you're just making large squares, but even then, a cutter makes it so much easier. Instead of cutting one square at a time, you can cut ten much more quickly. If you're doing anything that requires any accuracy, I'd say triangle or small square and up, you absolutely require a rotary cutter or else your pieces just won't line up.
Because the whole combo is so expensive and a bit intimidating for beginner quilters, a lot of people who come in will only buy one piece of the ensemble, despite my warnings against it. If you don't have all three, you may as well not have any. Sometimes rulers are useful for tracing squares, but that's about it. A rotary cutter without a mat and a ruler is actually really dangerous. If you're not sure you want to commit to paying that much money up front, trying seeing if you can borrow some supplies from somebody or take a class that lets you use theirs. To be honest, I don't have my own set because I do most of my quilting at the fabric store I work at. There's way more room there and they like us to use the demo machines anyways so that we can sell them better.
I've heard the most ridiculous stories about rotary cutters. One woman came into the store and bought a ruler and told me that it was for her daughter who was in the hospital because she had tried to use a rotary cutter with just a regular school ruler. I didn't know the details,but it sounded pretty bad. Another woman came into the store upset that her rotary blade was bending around the edges and wouldn't cut anything anymore. Turns out she was using planks of wood instead of a mat. *face palm* We offered her a free blade if she bought a mat and she accepted the offer.
Anyways, don't try to get around it; it's not worth it. Just find a way to use the whole combo. Your life will be so much easier.
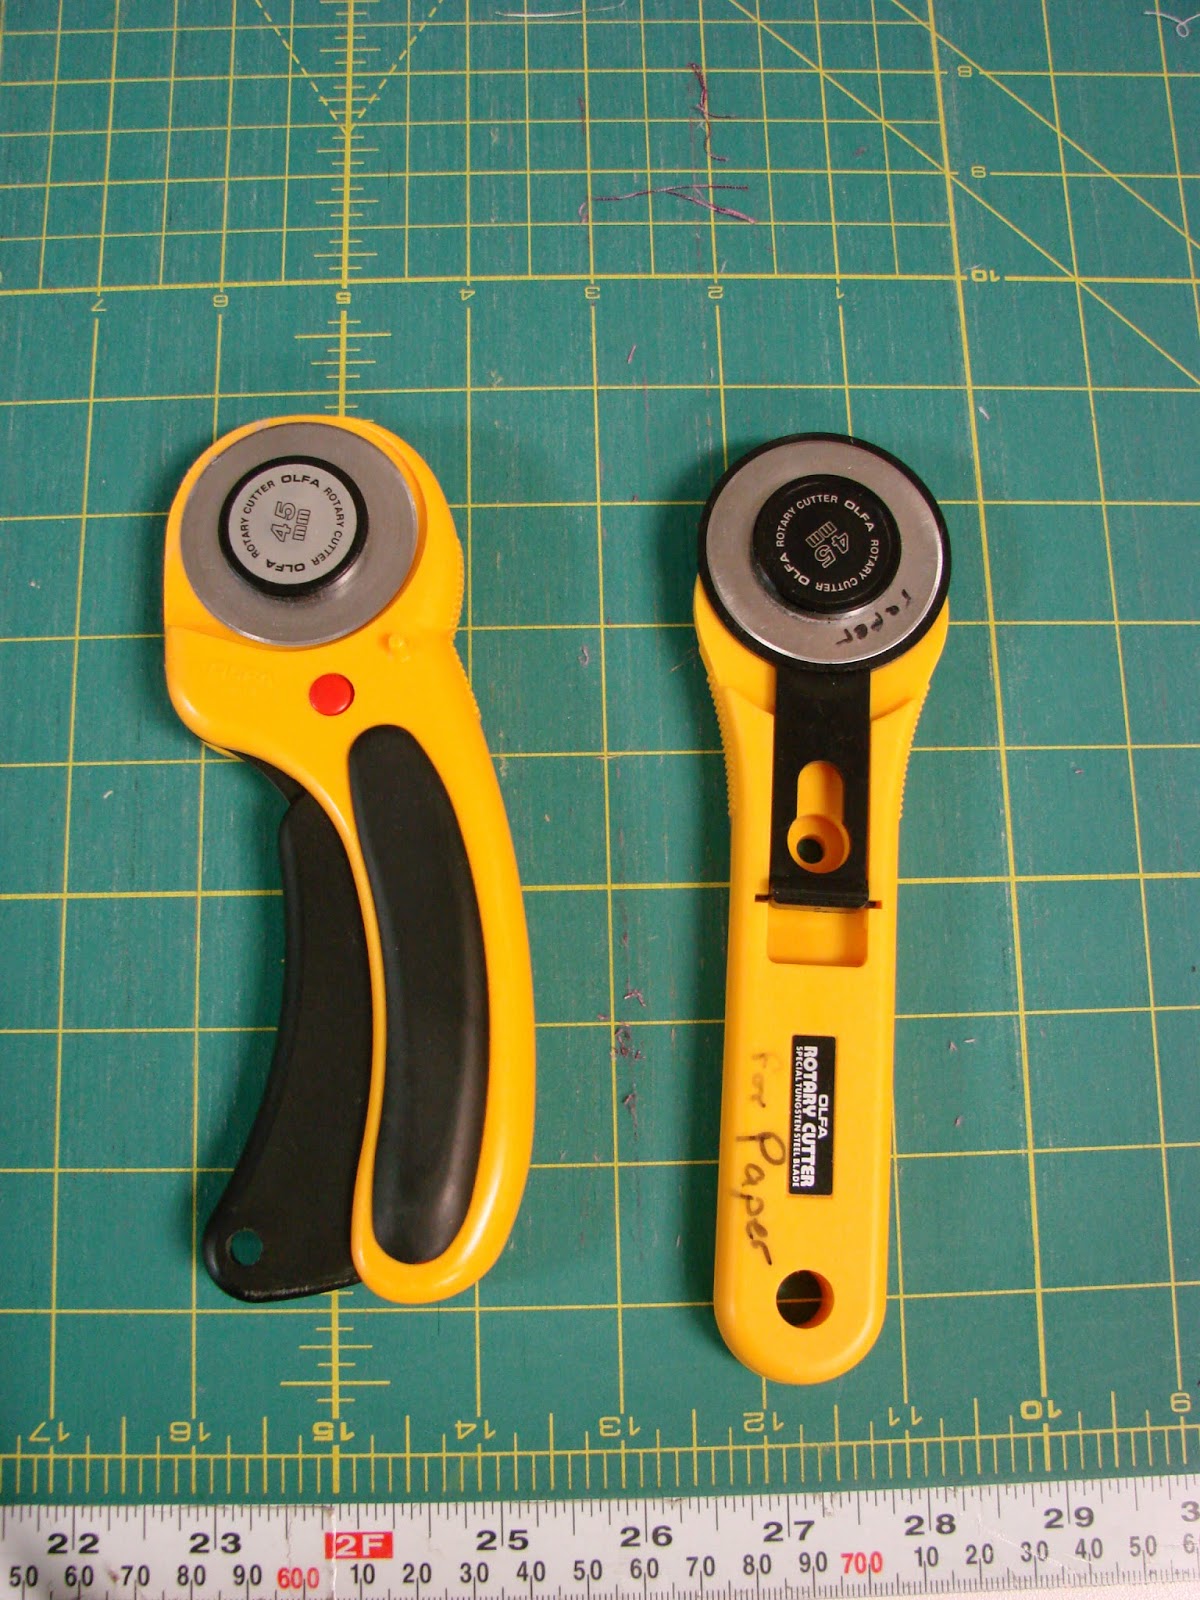
^These^ are rotary cutters; the pizza cutters of the quilting community.
When used alongside a ruler and a cutting mat, rotary cutters are generally used to cut straight lines and square-up fabric, which is basically what quilting is, unless you're doing applique or something else that involves non-straight lines.
The cutters in this picture are both Olfa cutters. I just use them because they're what we sell at our store, but I'm really happy with them. I would suggest the one on the left, which is a bit more expensive, but a lot safer and a bit more comfortable to hold. What makes it safer is that the blade is automatically covered unless you're squeezing the handle. The little red button can lock it in either the opened or the closed position, which can help prevent children or stupid people from hurting themselves with it when you're not paying attention. The top of the blade is also still covered even when the blade is out. The only way to cut yourself with it is to run yourself over while you're rolling it, which I think people are generally intuitively good at not doing. What makes it easier to hold is the curved handle.
The mat and ruler I've used in the pictures are Omni-Grid, again just because that's what we sell, but I quite like them.
The ruler you want to use depends on your project, but a good beginner/all-purpose one is the type I use in the pictures which is 8 1/2" x 22." It's nice to have a 22" one because you can cut WoF (width of fabric) with it and, of course, anything smaller. It's really helpful to have a ruler that has a grid on it (as opposed to just lines running one way), pretty much no matter what you're doing.
As for mats, it depends on what room you have. The ideal set-up, in my opinion, would be a 2' x 3' mat (as in the pictures), which is generally the largest size, and a smaller rotating cutting mat. While cutting out smaller pieces, it's generally best to rotate the cutting mat instead of your fabric, which can be hard to do with a big mat, but at the same time you often need to cut strips that are 22" or wider (when you trim your quilt or are cutting border strips, for example), in which case it's very handy to have a larger mat.
For a beginner, I would probably suggest a medium-sized mat with one side being at least 24" long (so that you can cut WoF).
How to Use 'Em
There are two main things you'll need to do in a beginner quilt that are easy with a rotary cutter and a bit of knowledge and practice: Squaring up your fabric and cutting in a straight line. Once you get into more advanced stuff, you might need more, but this will get you started.Squaring Up Your Fabric
Before you start cutting out your blocks, you will need to make sure that the edge you are cutting off of is square which means that both the top and bottom corners are at right angles and that the edge in straight. Keeping your fabric square is an important part to consistency and accuracy when cutting and will make for a better-looking quilt int the end.

First, you need to choose a side that you think is the straightest and line up one of the grid lines on your ruler with the edge.

Keeping that grid line lined up with that one edge of your fabric, move your ruler as close to the right side (or the left if you're left-handed) as you can while still being able to see a bit of fabric sticking out the whole way up.

It's very likely that this side will not line up with the ruler, which is why you're doing this. this piece of fabric only stuck out a bit at the top, but stuck out about 3/4" at the bottom.
Using the instructions below on cutting a straight line, you'll then make a cut, trimming off the uneven edge. Turn the fabric clockwise 90 degrees and do this again. Any block/strip cutting from this piece of fabric will now be cut from the left side if your straight edge is on the left (suggested for right-handers) or from the right edge, if your straight edge is on the right (suggested for left-handers). In either set-up, the bottom and top should both be straight.
These instructions and pictures are for people cutting the right-handed way. If you wish to do this left-handed, you'll be doing the exact mirror image of this.

Say you need to cut a 5 1/4" strip. You need to find the 5 1/4" line on your ruler and line it up with the the left edge of your fabric. You also need to be sure that the bottom of the fabric also lines up with a horizontal line on the ruler. Both the left and bottom edges of your fabric should be lining up with lines on the ruler, like in the picture. If they don't, then your fabric isn't square and you'll need to square it up in order to have an accurately-sized strip.

You'll then want to do the same thing at the top. Your left and top edge should both be lining up with lines on the ruler.

And from further back, it'll look something like this.

Trying not the move the ruler, you'll now want to secure it with your left hand. Most people just press their palm down on the ruler about 2/3's of the way up the ruler. I usually just put my whole forearm down on it, but I'm told that's bad form. Anyways, you'll want to be really sure that the ruler isn't going anywhere. The ruler is more likely to shift during the latter half of the cut, which is why your palm should be placed a bit higher up the ruler.
Now for the moment we've been waiting for; the cut. Take you rotary cutter in your right hand and while still holding the ruler down securely with your left, cut the fabric like a pizza, making sure that your blade is pushed against and following the right edge of the ruler.It's fairly normal to have a bit of difficulty with the ruler moving or the blade not following the edge of the ruler. It just takes a bit of practice. That's why you should practice on scraps for a bit or start with a project with nice big rectangular blocks where accuracy doesn't much matter.
If you're having severe difficulties, you can leave a comment and I'll try to help you, but I might not be able to. As always, in-person mentoring is the best way to learn if you can swing it.
Once you've got the hang of it, you can start layering your fabrics (as directed by your pattern, typically) so that you can cut out several strips at a time; makes things go much faster.
Well, there you have it. That's everything I can think of telling you about rotary cutting. Leave a comment if you have questions or just liked my tutorial. Thanks for visiting and I hope you can check out my other blog posts and/or come again. :)
------------------------------------
If you liked this post, then check our all the other networking nonsense I'm trying to be good at as well as the other posts on this blog.


